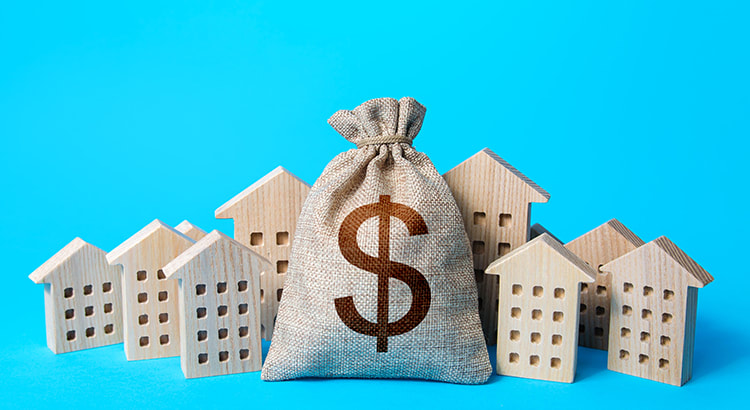
When you think of homeownership, what’s the first thing that comes to mind? Chances are you might focus on the non-financial benefits, like the security or stability a home provides. But what about equity? While it can be overlooked, a homeowner’s equity helps build long-term wealth over time. Here’s a look at what equity is and why it matters. So, as home values climb, your equity does too. That’s exactly what’s happening today. There aren’t enough homes on the market to meet buyer demand, so bidding wars and multiple offers are driving prices up. That’s because people are willing to pay more to buy a home. Right now, this low supply and high demand are giving current homeowners a significant equity boost.
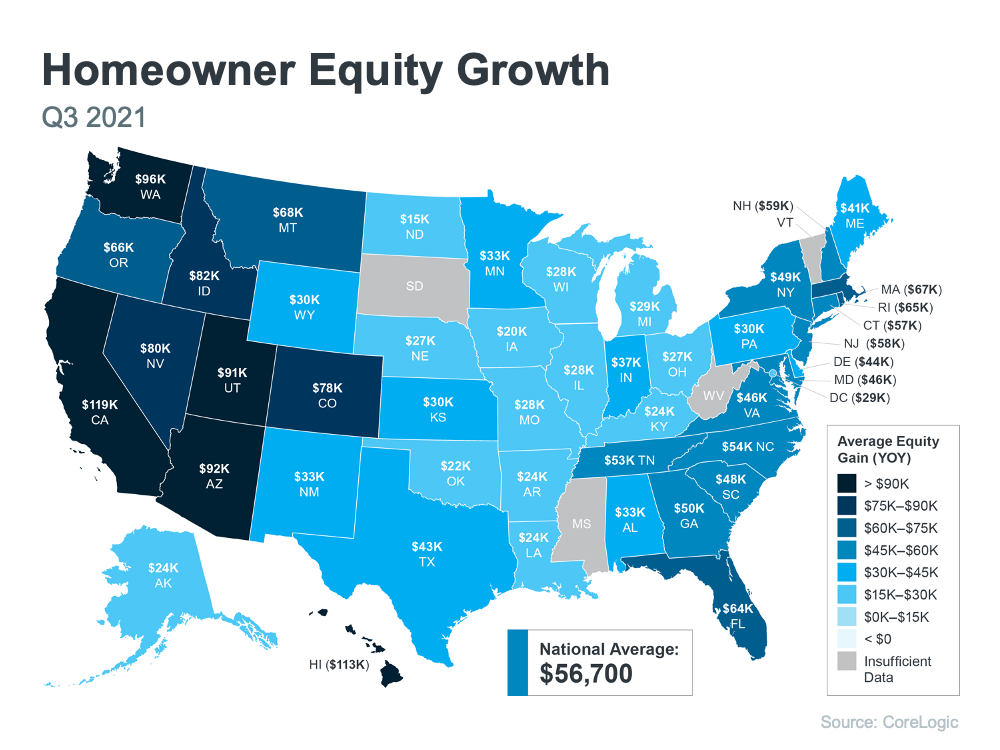
 To find out just how much rising home values have impacted equity, we turn to the latest Homeowner Equity Insights from CoreLogic. According to that report, the average homeowner’s equity has grown by $56,700 over the last 12 months. Curious how your state stacks up? Check out the map below to find out the average equity gain for your area. If you’re already a homeowner, equity not only builds your wealth, it also opens doors for you to achieve your goals. It works like this: when you sell your house, the equity you built up comes back to you in the sale. You can use those proceeds to fuel your next move, especially if you’ve decided your needs have changed and you’re looking for something new. f you’re thinking about becoming a homeowner, understanding the importance of equity can help you realize why homeownership is a worthwhile goal. It builds your wealth and gives you peace of mind that your investment is a wise one, not just from a lifestyle perspective, but from a financial one too. Whether you’re a current homeowner or you’re ready to become one, it’s important to know how equity works and why it matters. If this inspires you to make a move, let’s connect to explore your options and find out what steps you need to take next. Just contact us to find out how much your home value has increased. You should be pleasantly surprised. Jerry@DynamicHomeSelling.com or call/text to 706-577-0507
Water heaters face a love-hate relationship among homeowners. We love when they do exactly what they’re supposed to: give us hot water for our showers, our faucets and our dishwashers. But most people hate the realization that the hot water isn’t getting hot when it’s supposed to, especially in the shower. A good way to avoid this realization is to drain your water heater at least once a year. Here’s why. The water that runs through your water heater contains minerals. Over time, these minerals leave sediment buildup. This buildup can damage your tank or heating elements. It can also clog the drain and water lines, which can make your water heater run less efficiently, shorten its life span and force expensive repairs. With a little bit of time and a guide, you can drain your water heater yourself. You should consider draining your water heater once a year to extend its life and keep it running smoothly. If it’s making banging, rumbling or popping noises, then you should drain it as soon as possible. Those are signs of sediment buildup. Here’s how you can drain your water heater. 1. Turn off the gas or electricity If you have a gas heater, turn off the gas. There should be a shutoff valve for the gas supply lines to your house. If you have an electric heater, go to the fuse box and turn off the breaker that controls the water heater. 2. Turn off the thermostat The water heater’s thermostat is usually located near the bottom of the heater. If you have a gas heater, turning off the thermostat may also turn off the pilot light. If so, don’t forget to relight the pilot when you’re finished draining the tank. 3. Turn off the cold water supply to the tank You don’t want cold water to continue filling the tank while you’re trying to drain it! This can cause spikes in your water bill. This step is easy to overlook, so make sure you’ve shut off your cold water supply to the tank before going any farther. 4. Wait for the tank water to cool The water in your water heater could be scalding. If you try to drain scalding water, you’re likely to burn yourself. By waiting for the water to cool (about 30 minutes to 2 hours), you can more safely drain it. 5. Check for leaks Once you’ve turned off the above elements and let the water cool, it’s time to check for leaks. If you notice any dripping or standing water near your water heater, or any water near connected valves or pipes, you likely have a leak. A leak means higher water bills. It also means that your heater won’t run as efficiently as possible. At this point, you may need to research, find and contact a professional to assess the leak. Or, if you have a systems and appliances home warranty from 2-10 Home Buyers Warranty (2-10 HBW), you can file your claim through us and we’ll dispatch a quality, approved professional to assess your leak. 6. Open a hot water tap in the house If your water heater doesn’t have any leaks, you can move to the next step: opening a hot water tap in your house. Doing this prevents a vacuum from forming and makes draining the tank easier. Keep the tap open until you’re finished draining the tank. 7. Open the temperature and pressure (T&P) release valve The T&P valve will be either high on the side or on the top of the water heater. First, make sure it works. If it isn’t functioning properly, pressure can build inside, causing your water heater to burst. Here’s how to test it. Lift the T&P lever part-way, allowing it to snap back into place. Don’t lift it all the way. You should hear a gurgling noise as the valve sends some water to the drainpipe. Be careful as you do this. If you didn’t wait for the tank to cool, the hot water released may be scalding. If no water comes out or you don’t hear any gurgling, replace it immediately, as this is a sign that pressure could be building to a critical point. 8. Attach a hose to the heater’s drain If the T&P release valve is working correctly, connect a garden hose to your water heater’s drain line, which looks like a spigot near the bottom of the tank. Run the hose to your basement drain or run it outside the house. Use a strong hose. Cheap garden hoses can become soft when hot water runs through them, causing leaks. 9. Turn on all of the hot water faucets in your house This prevents vacuums from forming. Don’t be alarmed if the water only trickles out. That’s normal. 10. Open the heater’s drain valve, allowing the tank to empty Water and sediment will begin to drain through the hose you attached to the water heater’s drain. 11. Turn on the cold water supply to the heater Let water continue to flow through the hose until you see only clear water coming out. This may take some time. Once clear water flows from the hose, you can close the spigot. Then, all you need to do is: 12. Relight the pilot light or restore power to the heater13. Turn your heater’s thermostat back up14. Close the hot water taps throughout the house15. Turn the electricity or gas back on That’s it! You’ve successfully drained your water heater, lengthening its life. When Buying or Selling A Home with Us - We work hard to help you to feel confident about the transaction. Call, Text or email Jerry Today - 706-577-0507 Email: Jerry@DynamicHomeSelling.com to receive Free but critical information about your home and neighborhood. By the end of last year, many homeowners found themselves with more equity than they realized, and at the same time their wages were increasing. When those two factors unite, it can spark homeowners to think about making a move to a larger or more expensive home in the luxury space. That said, now is a perfect opportunity to take a look at the forecast for the 2020 luxury market. Three Things to Think About in the 2020 Luxury Housing Market 1. Prices The U.S. economy is strong today, with buying opportunities throughout the luxury end of the market. Thomas Veraguth, Strategist at UBS Global Wealth Management, says in Barrons.com, “There’s a good link between luxury real estate prices and [economic] growth.” Available inventory is a key element that can impact home prices. At the upper range, the inventory is greater in comparison to the entry-level market, making moving up to a luxury home a growing reality for many buyers right now. 2. Activity in the Market With more buying opportunities at the higher end, we should start to see an increase in activity. The same article states, “Affluent homebuyers will start to come out of the woodwork as they find rising luxury rents less appealing and sellers get even more negotiable on price.” Buyers looking in the luxury market are taking the opportunity to negotiate on price in a segment where there are more choices, too. According to the Luxury Market Report, homes sold for an average of 96.94% of the list price in December. Buyers are also getting more for their money with greater purchasing power due to the current low interest rates. 3. Buyers Are Coming Back Keep in mind, buyers are often sellers too, especially those looking to move up. Homeowners with an entry-level home can take advantage of the inventory shortage at the lower end of the market, thus driving higher sales prices for their current homes. Combined with growing equity in the homes they’re listing, it’s a great time for those who are ready to make a luxury move. The extra equity and greater purchasing power are bringing many buyers back to the market. The same article mentioned that, “We’ve already seen buyers who’ve been on the sidelines for two years tread back into the market.” Bottom Line If you’re considering entering the luxury market, 2020 is shaping up to be a great year for those who are ready to make that move. Let’s get together to set your real estate plan for the year. When Buying or Selling A Home with Us - We work hard to help you to feel confident about the transaction.
Call, Text or email Jerry Today - 706-577-0507 Email: Jerry@DynamicHomeSelling.com to help by giving Free but critical information about your home and neighborhood. As a homeowner, it’s important to keep your home running efficiently, not only to save money, but also to help the environment thrive. October 2nd is Energy Efficiency Day, a perfect time to think about making some key upgrades that will improve the efficiency of your home. If you’re looking to sell your house and increase the pool of potential buyers in your market, the upgrades below are truly a must. According with Wallet Hub, “In the U.S., energy costs eat between 5 and 22 percent of families’ total after-tax income.” What should you spend on utilities? Money Management says, “If you’re working with a budget, and trust me, you should be, your utility costs should be no more than 8-10 percent of your monthly income.” How can you make your home more efficient? EnergyEfficiencyDay.Org provides some handy tips that can help you improve the energy efficiency of your home. Here are a few simple ones to consider, and how to make them happen: 1. Make the Switch to LED LEDs are a great example of how innovation and technology can make your life easier. They last at least 25 times longer and consume up to 90 percent less electricity than incandescent bulbs. Tip: By switching five of your home’s most frequently used bulbs with ENERGY STAR® certified LEDs, it’s possible to save $75 on energy costs annually. 2. Seal Those Leaks On average, heating and cooling account for almost half of a home’s energy consumption. In fact, all the little leaks can be equivalent to leaving open a 3-foot-by-3-foot window. Tip: Take simple steps like caulking windows, sealing leaks around chimneys and recessed lighting, and sliding draft guards under your doors to save up to 20% on heating costs. 3. Heat and Cool Efficiently Don’t waste money heating or cooling an empty home. Install a programmable thermostat and in colder weather schedule your home’s heat to lower when you are away or asleep and increase when you are returning home or waking-up. In warm weather, schedule the thermostat to raise the temperature when you are away or asleep, and lower it at other times. Tip: Follow the U.S. Department of Energy recommended temperatures and be energy-efficient all year. 4. Maintain Your HVAC System Make sure to clean or change your furnace filters regularly. A dirty furnace filter will slow down air flow, making the system work harder to keep you warm (or cool) and costing you more money. Tip: Consider getting a winter tune-up. Just as a tune-up for your car can improve your gas mileage, a semi-annual or yearly tune-up of your heating and cooling system can be vital to improve efficiency, saving you money and making your home more comfortable. Bottom Line By making a few key upgrades to your home, you’ll save on your utility bills and improve the energy efficiency of your home. When you’re ready to sell your house, these key features will make it even more attractive to potential buyers. Let’s get together to discuss what buyers are looking for when it comes to energy efficiency options in our area. Email or Call/Text When Buying or Selling A Home with Us - We work hard to help you to feel confident about the transaction. Call, Text or email Jerry Today - 706-577-0507 Email: Jerry@DynamicHomeSelling.com to help by giving Free but critical information about your home and neighborhood. The information contained, and the opinions expressed, in this article are not intended to be construed as investment advice. Keeping Current Matters, Inc. does not guarantee or warrant the accuracy or completeness of the information or opinions contained herein. Nothing herein should be construed as investment advice. You should always conduct your own research and due diligence and obtain professional advice before making any investment decision. Keeping Current Matters, Inc. will not be liable for any loss or damage caused by your reliance on the information or opinions contained herein. Real-estate experts reveal the premium amenities that appeal most to home buyers If the way to a man’s heart is through his stomach, then the way to a home buyer’s wallet may be through the kitchen. A new report from real-estate firm Zillow ZG, -3.27% found that home listings touting premium kitchen features sold for 30% or more above the expected price. To complete the analysis, Zillow examined the listing descriptions for 4.6 million home sales across the country that were on the market in 2017 and 2018, identifying specific features that led to a higher sales price or faster sale. he biggest money-making features were steam ovens, wall ovens that pump in steam to cook food in a healthier manner. These netted a 34% sales premium, higher than any other feature. Of the 10 home features that generated the biggest boost in the home’s sales price, six were kitchen related. These amenities included professional-grade appliances (32% premium) and wine cellars (31%), and “pot fillers,” attachments that extend a faucet so it’s easier to put water into a big pot (28%). Money-making features that weren’t specific to food and drink included steam showers, a “garage studio” and heated floors. Just because properties sold for more than expected doesn’t mean they sold faster. In fact, homes with steam ovens were the slowest to sell, taking 22 days longer than similar homes in the same market and price tier. This, Zillow said, is an indication that certain amenities may appeal to a very niche audience — but one that’s willing to pay more for homes that fit their vision. Generally, faster sales were associated with properties that had features that have been popularized by remodeling shows on television, such as open shelving (11 days faster than expected) and subway tile (10 days faster). For buyers of starter homes, a slightly different set of amenities had more appeal. The No. 1 feature among these properties were free-standing bathtubs — properties with these sold for a whopping 59% above asking price. The “Chip and Joanna Gaines Effect” — a reference to the hosts of the HGTV show “Fixer Upper” — is also still in full-swing: Craftsman features prompted starter-level homes to sell for 38% above their expected price. Other popular features in starter homes include pizza ovens (47% premium) and coffered ceilings (32% premium). These amenities, however, don’t boost a home’s selling price singlehandedly. Indeed, most home improvement projects don’t even recoup their full cost through a higher resale value. Rather, these features — when identified in the home’s listing description — can act as a signal to buyers that the property is in good condition. “If you have these features, flaunt them,” said Skylar Olsen, director of economic research at Zillow. “Having a steam oven, a heated floor or other luxury features in the home is a signal that there is more than the home’s basic features at play. These homes are special. They likely come with an elevated design sense and the extra touches valued by home shoppers who can afford the best.” Source: Market Watch
WRITTEN BY FIXRPOSTED ONWEDNESDAY, 12 DECEMBER 2018 05:00 6 variables to consider When planning your kitchen, you need to be aware of certain factors when it comes to the type of your counter-top. To streamline the selection process, Fixr created the below two graphics using 6 key variables. The same 6 variables were considered in both graphics, however, the focus changes depending on the graphic which will be explained further in each section.
Installation is one of the first factors; can the contractor access your house with the delivery vehicle and is there space to work the material on site as necessary? Cost refers to the cost implications relating to either the material itself or the installation process. Maintenance looks at the day to day care that is required to ensure the counter-top does not wear excessively or get damaged. Durability focuses on how well the counter-top stands up to use, including nicks or dents and water or heat damage. Options available refers to the range of options in terms of color or finish that are available for that material or counter type. Stain resistance is the last variable and it considers the surface resistance of the counter-top. A marble material or the grout in a tiled counter-top may be more susceptible to staining than other options, especially in a kitchen where various acidic or alkali foodstuffs may spill onto the surface. Working with the scores, based on their own counter-top installation cost indicator, it is possible to simplify the selection process using a numeric score. The better the product performs with regard to cost, installation, maintenance, stain resistance, durability and options available, the higher the score it has. Read The Whole Article on Realty Times with illustrations! WRITTEN BY JAYMI NACIRIPOSTED ONSUNDAY, 02 DECEMBER 2018 05:00 The idea of renovating your bathroom can be overwhelming, but you don't have to knock down walls or gut the whole thing to make it feel new again. Making smart updates can get you closer to the look you want without the big budget, or the big hassle.
"You dream about a bathroom that's high on comfort and personal style, but you also want materials, fixtures, and amenities with lasting value," said houselogic. "Wake up! You can have both." Here are a few places to start. 1. A new showerhead This is one of our favorite ways to freshen up a bathroom because a new shower headis: A) inexpensive, even for one that provides multiple heads and functions; B) an easy way to make your shower more enjoyable if you've been dealing with an old shower head that doesn't provide massage or handheld options; and C) also a money saver since new shower-heads are more energy-efficient. 2. Soaker tub Soaker tubs are the hottest trend in bathrooms right now, and it's getting to the point where anything else makes your bathroom look outdated. Have one of those giant Jacuzzi tubs in your bathroom? It's probably time to yank it out, especially if your jets stopped working long ago. The bonus of a freestanding tub is it can also make your bathroom feel airier and more spacious. 3. Walk-in shower Your dinky shower with the tired tile and the metal trim isn't fooling anyone. You don't have to tear the whole thing down (but, if you can, by all means!) Removing the tile and replacing it with something more current can do wonders, especially if you're going from something dark and cave-like to a choice that's light, bright, and reflective. A seamless glass enclosure can give the shower a more expansive and current look with minimal work. 4. A smaller mirror Sounds funny to be think about replacing your large mirror with something smaller, right? After all, it's a bathroom. But if you've toured a model home lately or watched a bathroom be remodeled on HGTV, you've probably seen this swap. Taking down your full-width mirror and replacing it with something more tailored to the size of your vanity will instantly give the bathroom a lift. Have two sinks? Get two smaller mirrors. And make sure they're framed out. A plain slab of mirror is just…plain. 5. New lighting Those cheap builder lights are making your bathroom look DATED! Some of them are so bad they can make an otherwise stylish bathroom look not so great. Replacing the lights is easy (and inexpensive!). Just make sure to get your mirror situation figured out first so you know what width your lighting should be. A light fixture that's wider that the mirror is going to make everything look off. 6. Vanity overhaul There are several ways to make an old vanity/sink combo look more customized and more updated. Changing out the faucets, painting the cabinets, and adding hardware can work wonders. But if the cabinet door or drawers aren't in good shape, if the sink shape is just too dated, or if you just want to rip the whole thing out and dump it on the lawn, it might be time for something new. If you are going to replace your vanity, take a look at floating versions—a hot look today that that's also great for a smaller space because it keeps the eye moving. Article Link When it comes to refreshing your home, nothing delivers a bigger bang for your buck than paint: You can add significant value and improve your home’s energy efficiency (yep, you can!) by doing it yourself. And, of course, the DIY approach will save you money—about $2,000 on an exterior job and as much as $500 per room, according to the website HomeAdvisor.
Many people shy away from painting their own homes because they think it’s too difficult. But with the right tools, it’s totally possible to DIY it. “The biggest factors are comfort and equipment,” says Dan Schaeffer, owner of Five Star Painting of Austin in Texas. “It’s relatively easy to paint walls, but painting cabinets, for example, typically requires specialized spray equipment, which most homeowners don’t have.” So consider the scope of your project, and follow the tips on color and technique below for a successful paint job: Pick The Perfect Hue When it comes to your home’s overall value and energy consumption, some colors are actually better than others. For interiors, Schaeffer recommends crowd-pleasing neutrals, which make rooms appear airy. “For interiors we are seeing grays, light greens, blues, and whites are all popular now,” he says. And according to a 2016 Zillow Digs study, these hues really do pay off: For-sale listings with warm neutrals can sell for as much as $1,300 more than asking. (Even just painting your kitchen—in a light, creamy yellow, for instance—can fetch up to $1,360 more.) For exteriors, Schaeffer says darker colors will absorb more heat, which can increase air-conditioning bills. Darker colors also fade faster, requiring more maintenance and costing more in the long run. So from an efficiency and curb appeal point of view, Schaeffer recommends colors consistent with the architecture and building materials used on the house. On most newer homes, those colors are grays and beiges, which are classic and work harmoniously with a variety of other accent building materials like stone, wood and brick. Shine On According to Schaeffer, sheen adds durability to interior walls because it’s easier to clean, making it a cost-effective solution for high-traffic areas. “Focus on putting sheen in places people touch a lot,” says Schaeffer. Eggshell, which imparts a subtle shine, is great for bathrooms and living rooms. Schaeffer recommends upping the sheen factor by using semigloss for cabinets, trims and doors because they get damaged easily, and using matte paint on ceilings. Sheen’s hardiness also makes it a good choice for exteriors. “Satin finish is most commonly used for its durability,” says Schaeffer. But if your exterior is masonry or stucco, a lower sheen is better at hiding imperfections. Prep Properly And Use The Right Tools “The first step in any painting project is to free the walls of any dirt or dust,” says Schaeffer. Wipe down walls with a damp rag. If you’re painting a kitchen or bathroom, check walls for soap scum and grease, which might require a degreaser for removal. Make sure there are no nail holes or cracks in your surfaces. If need be, patch walls, then smooth them down with sandpaper. Schaeffer recommends using drop cloths to cover floors (and furniture, if you can’t move them), then, depending on the project’s scope, applying painter’s tape to baseboards, trim and moldings for protection. You’ll need a brush, extension pole, roller and liner for the roller pan. You’ll also likely need a ladder to reach the top of walls and ceilings (always have someone hold it secure while you’re on it). If working with chemicals to thin or strip paint, wear gloves, closed-toe shoes and a face mask or respirator. Remember to ventilate the room by opening windows for as long as possible—at least during the painting and as the walls dry. Master Proper Painting Techniques Schaeffer says to start jobs from the top of a room and work your way down: Ceilings (if you’re painting them), walls, baseboards then doors. Paint along the edge of the ceiling in a line (from side to side) with a brush, a technique called “cutting in,” then do the same along windows, doors and molding on that wall. Then get rolling. You’ll want to keep a “wet edge,” which means rolling on top of wet paint to keep color consistent (in other words, don’t let the previous edge dry before painting your next stroke over it), says Schaeffer. Generally, two coats of paint are needed for any color change. Follow manufacturer’s directions for dry-time recommendations in between coats. For exteriors, Schaeffer says to begin with the body and siding, then finish with the trim. Let the pros handle painting anything over one story, since it tends to be labor-intensive and will require the use of tall ladders. Want even more advice on increasing the value of your home? Try these 5 ways to increase your home’s curb appeal. By Danielle Blundell Source Geico: https://www.geico.com/more/living/home-improvement/diy-house-painting/ Visit our Website to view Columbus, GA homes. Sophisticated cabinets. An inviting color palette. Striking countertops. When it comes to remodeling your home, you don’t need a large budget to create a sense of elegance in your favorite rooms. According to Katie Skoloff, principal designer and founder of In Site Designs, there are easy ways to add value to your home and freshen up its look at the same time. “It’s a double win for homeowners,” she says. 1. Revamp Your Cabinets Kitchen upgrades are sure ways to increase a home’s value, but not everyone has the time—or the budget—for a full-on kitchen makeover. One of Skoloff’s favorite secrets is to paint or stain the cabinets, which can make the room feel fresh and modern. “When you’re trying to make your house look a little bit ‘richer,’ think of how you get dressed,” says Karen Gray-Plaisted, principal owner and lead decorator at Design Solutions KGP. “You have your basics, and then you add jewelry, accessories, a jacket, etc.—with a house, it’s the same thing.” Like a statement necklace paired with the right dress, a stylish new coat of paint on the cabinets can enhance the whole room. Gray-Plaisted recommends darker colors (black or navy) on the lower cabinets and lighter colors (white, light gray) on the upper to create a sophisticated appearance. 2. Pull a Fast One When it comes to knobs on those cabinets, says Skoloff, brass and polished metal are dressier elements that can light up a room. Use brass knobs to add elegance to cabinets, doors and drawers for $5 (or less) each. They’re simple to install yourself, making this a home upgrade that’s both affordable and easy. For those who find brass a bit old-fashioned, Skoloff recommends knobs made of brushed nickel. Another option is to forgo knobs in favor of handles, or “pulls,” which she says give your cabinets more substance. 3. Go Concrete For years, granite or marble countertops have been the go-to choice for a kitchen remodel, but lately a surprising newcomer has challenged them: concrete. It can be just as attractive, says Gray-Plaisted, and it’s far more affordable than marble or granite. Skoloff agrees that concrete can look great, though she warns that it does show wear over time, meaning it may not be perfect for homeowners who always want their kitchen to look brand-new. If you think weathered materials give a kitchen extra character, however, concrete may be right for you. Skoloff also cautions that it’s important to choose a contractor who has experience installing the material. 4. Hit the Roof Few things make a home look statelier than a slate roof, but real slate comes with a steep price. For homeowners who want the same style at a lower price point, Skoloff recommends synthetic slate. While this is still not cheap, she says its durability offers a “great bang for your buck.” When opting for synthetic slate, it pays to do your research, so you can choose the best type for your needs. Skoloff prefers look-alike slate shingles made of rubber and/or plastic (as opposed to asphalt), especially for homes in areas with lots of snowfall and hail, as these materials are more resistant to the elements. Plus, she says, “they’re lighter, they look fantastic, and they’re often made out of recycled material.” Source: Geico - https://www.geico.com/more/living/home-improvement/inexpensive-home-improvements/ Visit our Website To View Columbus Ga Homes For Sale. "According to a new report from Realtor.com, smoking in a home can reduce property value by up to 29 percent." Most real estate investors know that a “smoking home” can be a bear to clean up. However, the issue may go far beyond the cost of smoke and stain removal. According to a new report from Realtor.com, smoking in a home can reduce property value by up to 29 percent. That number could climb as more studies on “third-hand” smoke (THS), the residue left on walls and in fabrics long after a smoker has left the area, indicate that this remainder may be extremely harmful.
Joshua Miller, director of technical training at home restoration company Rainbow International, told Realtor.com reporter Audrey Ference, “The lingering odor isn’t just unpleasant; studies have also linked it to cancer.” He added THS is particularly dangerous for pets and small children since both are more likely to transfer smoking residue on their hands and into their mouths. Not Just an Issue of Smell Anymore Historically, savvy real estate investors have been happy to purchase smokers’ homes at deep discounts because, with some very hard work, they are able to purge the smell and clean the home. While the upfront investment in cleanup and remediation may be hefty, the payoff usually is as well. However, the new THS research may mean more remediation than has been necessary in the past and, possibly, that the new owner will need to work closely with an inspector to find out if there is a serious issue with THS.. Sellers are not presently required to disclose if a former resident is a smoker. Ference warned a fresh coat of paint can temporarily mask the smoky odor but that it will likely return. Are Smoky Houses a Lost Cause?Does this mean you simply shouldn’t buy a home that belonged to a smoker? Not necessarily. Here are a few steps that may help remediate the smell issue as well as problems with THS:
Bryan Blankenship, CEO of Ohio Turnkey, added that in his experience, shellac-based primers work best as an under-layer before fresh paint. “If you are going to buy a smoker’s home, just realize how much work you are going to have to do [when you buy it],” he warned. “You will have to remove all soft surfaces entirely just to get started.” Painting is one of the most inexpensive ways to give your home a makeover. Whether it’s updating an old bathroom paint scheme or adding a bold accent wall, painting can totally transform a room. But painting can be a big hassle and come with tons of prep work and clean up. Here are a few of Breakthrough Broker’s top tips to make your painting experience more enjoyable and lead to a more professional finish.
Prep beyond tape and drop cloths A drop cloth will protect your floors, but a thick and durable drop cloth is also a little clumsy to maneuver. For smaller, awkward items that are in danger of paint splatter, use plastic wrap. It’ll make it much less frustrating to protect a toilet or bathroom sink. Be ready for spills and splatters At the very least, a few drops of paint are going to end up where you don’t want them. Have a rag and some Q-Tips ready for the inevitable paint splatter, so that you can quickly wipe them off before they dry and set on your frames, countertops, or hardwood floor. Use heat to remove tape Patience is key when removing painter’s tape, but it can still tear and leave splotchy edges no matter how careful you are. Hold a heat gun or hair dryer a few inches away from the tape as your remove it little by little. The heat will break down the adhesive and make removing the tape a much less frustrating task. Use the subscribe button on the right side to get immediate emails of new articles. ....... Homeowners who want to make a strong impression must prioritize curb appeal. Homes with strong curb appeal sell well and can impart a welcoming feeling to all visitors.
Improving curb appeal does not have to be expensive and following are a handful of ways to improve the appearance of your home.
Like these post? Sign up to subscribe to email alerts and you'll never miss a post. It’s easy to take a few missteps when it comes to lawn care, especially if you’re a new homeowner and it’s your first time being solely responsible for your yard and landscaping. Here are a few tips that will help you avoid lawn-related frustrations.
Cutting the grass short. Lowering the height of your mower blades may give you a few extra days between each mowing, but it’s bad for your grass in the long run. Don’t go any shorter than 2.5 inches, or your grass could be starved for sunlight. Watch where your dog urinates. Finally out of an apartment and ready to let the dog into the back yard when it’s time to go? You might regret it. Your pets’ urine can kill your plants and grass. Try to train your dog to go in one spot, preferably in stone or gravel. Be careful with fertilizer. Fertilizing your lawn isn’t as simple as picking up any bag at a local store. Choosing the wrong fertilizer, using too much, or ignoring the instructions is a recipe for disaster. Do plenty of research or ask a professional if you need help choosing. Give your plants room to breathe. The nutrients in soil are a finite resource, and your plants and shrubs also need their fair share of water and sunlight. If you plant your shrubs, trees, and flowers too close together, they’ll have to compete for those resources and may become malnourished. Pay attention to the planting recommendations for each plant to make sure that they have the proper space to thrive. If you are not a Homeowner yet and would like to explore the options, see our short video about what it takes to be a Homeowner. Renovations never seem to go as planned. There’s always a cost you didn’t anticipate, or a problem that didn’t reveal itself until the project was underway. Here are five common costs to look out for.
1. Higher utility bills: If contractors and builders are working in your home all day, there’s a good chance they’re constantly walking in and out the exterior doors. That wreaks havoc on your heating/cooling efficiency, so watch out for higher utility bills. 2. Movers: It’s pretty hard to renovate a fully furnished home. You may be able to move and store most of your furniture yourself, but homeowners often have bigger pieces that require some hired help. 3. Food: If your kitchen is being torn apart, preparing meals becomes a lot more difficult. You may be able to keep your food budget steady by switching to meals that don’t require counter space, the stove, or the oven, but don’t be surprised if you end up dining out more often. 4. A few nights in a hotel: Depending on your renovation, there may be some nights where sleeping in your home isn’t practical, or you just need a mental break from the mess. Budget for a few nights at a hotel ... or just schedule your family vacation for the worst part of the renovation. 5. Deep cleaning: It’s one thing to clean and maintain your home after a typical week or two of living. It’s entirely different to clean up after a construction project, as sawdust and other debris can get in every nook and cranny. It may be worth your sanity to just hire cleaners. Going green is great for the environment, but that’s not the only benefit. When you make green upgrades in your home, it can also lead to some major savings.
1. Solar panels: The upfront cost is big, but the long-term savings are huge. Solar panels will cost several thousand dollars to install, but ongoing maintenance costs are very low, and a typical system could save you hundreds of dollars per year. You can even sell your surplus electricity. 2. Wood furnace: Wood-burning furnaces are relatively inexpensive, and though the yearly savings aren’t as dramatic (about 10% on heating bills), it adds up over the long run. 3. Insulation: There’s a good chance your insulation isn’t very efficient, especially in older homes. Look into installing floor, cavity, wall, and loft insulation to reduce your heating bills. 4. Rain barrels: Rain barrels are extremely inexpensive, and provide gallons of free water to use when you wash your car or water your garden. 5. Geothermal system: OK, so the price tag is scary at first. A geothermal system uses the earth’s temperature to heat and cool your home, but can cost $30,000 to install. But tax credits allow you to get a lot of that money back, and the energy savings average about $1,900 per year. If you plan to be in your home for a decade or two, it’s a great investment. |
Jerry W Williams
Publisher
Like this column?
Sign up to subscribe to email alerts and you'll never miss a post. Categories
All
Archives
December 2021
|